Backpacking Stoves

Gear Advice: Backpacking Stoves for Pohnpei

Liquid Fuel Stoves

MSR Whisperlite Liquid Fuel Stove
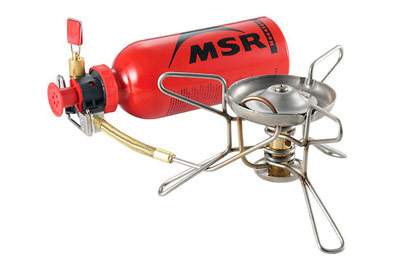
Liquid fuel stoves, such as those made by MSR and Optimus / Svea, are an option on Pohnpei, as white gas is available at the local hardware stores.

PROS: They heat quickly and have adjustable flames. They perform well in windy conditions. You can buy the fuel on-island.

CONS: You can’t bring these stoves on the airplane — you’d have to ship them to yourself surface mail, which would take up to 2 months. Liquid fuel stoves are also notorious for clogging. You have to waste fuel to prime some of them. The fuel is pretty toxic, and if it leaks in your pack, it will ruin a lot of stuff. Fuel has to be stored in metal bottles — which are heavy. The stoves themselves are also heavy.

Canister Stoves

Canister StoveThese stoves are fueled by an external butane or propane fuel canister that is thrown away when depleted.

PROS: They are more fuel-efficient than a liquid fuel stove.

CONS: The canisters are expensive and heavy. You can’t find replacement canisters in Pohnpei’s stores. Canisters can’t be brought on an airplane at all (including airmail), because they contain pressurized, flammable material. They’re also very bad for the environment; empty canisters can’t be refilled — they end up as trash.

Alcohol Stoves

Cat Food Can Alcohol StoveThe last choice is the alcohol stove. This is the simplest type of stove, the lightest, and the least prone to malfunction, because it has no complicated parts (no parts at all). It is nothing more than a reservoir that holds fuel, which is set aflame and burns out on its own.

PROS: The benefits of this stove type for an adventure trekker are many. Alcohol stoves are small and weigh less than 28 g (5 oz). They are fueled by denatured alcohol, which is cheap and can be purchased at Pohnpei’s hardware stores. Fuel can be stored in a regular plastic bottle. You can make the stove itself for less than $10.00 with simple materials found on Pohnpei, so you don’t need to worry about bringing one. If you do bring one, it can be taken on the airplane, as long as it’s clean.

CONS: Alcohol stoves have a slower than average boil time (6-8 minutes) and a lack of flame adjustment. It’s easy to crush these tiny stoves, but they can usually be bent back into shape with relative ease.

OUR RECOMMENDATION: A self-made cat food can alcohol stove combined with a home-made windscreen is by far the the most practical and affordable choice for Pohnpei trekkers. Watch Andrew Skurka’s video below to learn how to make this awesome stove.

Adventures >> Gear Recommendations >> Stoves

Backpacking Cookware

Gear Advice: Backpacking Cookware for Pohnpei

MSR Titan Kettle

MSR Titan Kettle Titanium CookwareThis is a popular model among ultra-light trekkers. It holds 0.85 L (0.9 qt) and has a lid and folding handles.

PROS: It’s light — just 4.2 oz (119 g) — very durable, and not too pricey (about $60.00).

CONS: After heating, the handles are too hot to pick up bare-handed. This pot has a reputation for being hard to clean (some foods tend to stick). It’s too small if you’re cooking for two.

Evernew Titanium Pasta Pot

Evernew Titanium Pasta PotThis is a 1 L (1 qt) pot with folding insulated handles and lid.

PROS: It’s even lighter than the MSR Titan Kettle at 4.1 oz (116 g). The insulation on the handles makes it possible to grip them without protection. It has a nice strainer feature on the lid for pouring off excess water. You can get it for cheaper than the Titan, too, at about $45.00.

CONS: It’s not quite as durable as the MSR Titan. Like the Titan, it’s a small pot that isn’t practical when cooking for others.

MSR Base 2 Pot Set

MSR Base 2 Cookware SetIf you’re cooking for two or more, the MSR Base 2 Set is an option. It includes 1.5 L (1.6 qt) and 2.5 L (2.6 qt) pots that nest inside each other, a lid, and a detachable pot-holder.

PROS: For what’s included, the weight isn’t too bad — about 1 lb (481 g) for everything. The coating on the pots prevents sticking of food, making cleaning easier. The detachable handle doesn’t get hot the way an attached handle does.

CONS: Aluminum isn’t as light as titanium and it’s also less durable — the pots tend to get bent out of shape. They also scratch easily; the coating doesn’t stand-up over the long-term. It’s way too heavy if you’re cooking just for yourself.

OUR RECOMMENDATION: If you’re eating on your own, the Evernew Titanium Pasta Pot narrowly beats out the MSR Titan. If you’re cooking for a small group, the MSR Base 2 Set is the best choice.

Adventures >> Gear Recommendations >> Cookware

Water Bottles

Gear Advice: Water Bottles for Pohnpei

Nalgene Classic Hard-Sided Water Bottle

Hard-Sided Bottles

Hard-sided plastic bottles made by companies like Nalgene are a common choice among backpackers.

PROS: They don’t leak in your bag or crack when dropped (at least the stalwart classic model).

CONS: They’re heavy and bulky, and an empty bottle will take up just as much space in your pack as a full one. This is a problem when you’re doing longer hikes, where every bit of your backpack real estate is precious, or when covering very rough terrain, when you want your load as light as possible.

Platypus Collapsible Water Bottles

Collapsible Bottles

An alternative to hard bottles are soft-sided bottles, like those sold by Platypus. These are essentially the modern version of the water skin. They have small openings to prevent the water from spewing out when handled.

PROS: They’re light and can compress to next to nothing when empty.

CONS: They can rip or puncture, and they aren’t as easy to refill as hard-sided bottles because of the small mouths.

Camelbak Hydration Bladder

Hydration Bladders / Reservoirs

A third choice for water storage is a hydration bladder or reservoir. This is essentially a large, plastic water sack with a drinking tube and valve at one end. Bladders usually go with a canvass or nylon pouch or backpack-style carrier. Many good companies make them, including Camelbak, Platypus, MSR, Nalgene, and Osprey.

PROS: There are several really strong points to using bladders. They allow you to distribute the weight of the water you’re carrying evenly across your back, and they are lighter than hard-sided bottles. The bladders are designed to lay flat, and because they are soft-sided, you’ll never have to worry about the corner of a bottle sticking into your ribs or scapula as you hike. You can find backpacks with an outside pocket specifically designed to hold the reservoir. The reservoir doesn’t need to be removed from your pack in order to drink, because the drinking tube is always hanging over your shoulder. In fact, you don’t even need to stop hiking; you can just grab the valve with your mouth and bite down on it to drink as you chug along. Almost all bladders have a large screw-top opening, which makes filling them easier.

CONS: Reservoirs are designed to carry all your water, so they tend to be much bigger than soft-sided bottles, and as you drink the water, what’s left sloshes around a lot until you stop to refill. Marginally annoying. They are also heavier than soft-sided bottles, mainly due to the drinking tube. Like soft-sided bottles, bladders can be punctured or torn and are also prone to leaks at the seams. Filling them completely can be a challenge if you’re dealing with a stream or waterfall; you’ll need someone to hold the bladder up in the air and then either pour or pump water into it (you can’t fill it while the thing is lying on the ground). The bite valves get chewed up over time and don’t work as well anymore. They can also clog easily if there’s any sediment in your water. Perhaps the biggest drawback is keeping bladders clean. They don’t dry easily inside and are prone to bacterial and fungal growth; it is necessary to regularly flush them with vinegar, baking soda, or bleach. Sometimes the water can taste a bit funky compared to other types of water storage — probably due to the previous point. Finally, bladders are the most expensive option for water storage.

For an in-depth review of the top 10 hydration bladder models on the market, check out this article at SealGrinderPT.

OUR RECOMMENDATION: Hard-sided bottles are fine for half-day hikes, but soft-sided, collapsible bottles are more practical for longer treks when weight and efficient use of pack-space are crucial. Bladders have some definite advantages for shorter hikes, but also score below soft-sided bottles in terms of practicality for multi-treks in challenging terrain.

Adventures >> Gear Recommendations >> Water Bottles

Shelters

Gear Advice: Shelters

Tents

Sierra Designs One-Man Tent
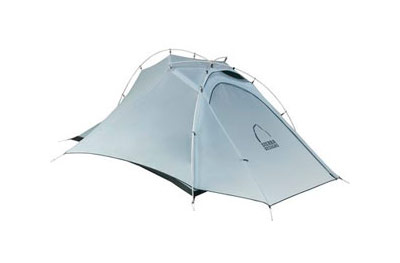
Weekend hikers usually think of tents as the definitive backpacking shelter, but they actually have many drawbacks. One tent model is available for purchase on Pohnpei, but it’s so heavy you’d never want to hike anywhere with it much less Pohnpei’s rugged mountains and rainforest. Those set on using a tent should bring one from home. Sierra Designs is a good brand.

PROS: Tents are easy to set up on any patch of relatively flat ground and don’t require trees. They protect sleepers against wind and blowing rain. They keep the bugs out.

CONS: They’re very heavy and bulky. Even the most well-ventilated models don’t provide enough airflow to be comfortable in Pohnpei’s extremely warm, humid climate, soaking the occupants in sweat and the condensation from their breath. They require a groundsheet as insulation, which is added weight in your pack. The typically nylon rainflies won’t be able to stand up to Pohnpei’s torrential rains for very long. The poles sometimes break. Finally, good tents are really expensive — $500+ is not unusual.

Tarp Systems

The “big blue tarp” that is widely sold on Pohnpei is terrible for hiking — bulky, very heavy, and difficult to hang without a lot of conveniently located trees and skeins of heavy rope. There are, however, tarps that are well-designed for trekking. The best are made by Mountain Laurel Designs.MLD Cuben Fiber Grace Tarp

For a single sleeper, the 2.1 x 1.5 x 2.7 meter (7 x 5 x 9 ft) Cuben Fiber Grace is a good choice. It only weighs 180 g (5.9 oz), the ridgeline is bonded and taped, and there are 8 tie-outs. The tarp can be hung as an A-frame with a ridgeline or pitched like a tent with trekking poles as the vertical supports. Cuben Fiber can stand up to a solid night of heavy rain without issue.

MLD Hammock Hexagon TarpFor a pair of sleepers, the Cuben Fiber Grace has a larger 2.6 x 2.1 x 2.8 meter (8.5 x 7 x 9.2 ft) version that weighs 225 g (7.8 oz). Also, a larger, heavier option is the 3.2 x 2.6 meter (10.5 x 8.5 ft) Hammock Hexagon Tarp, which weighs 241 g (8.5 oz). It also has a bonded and taped ridgeline seam, but only 6 tie-outs. Though it is designed to hang above a hammock, it can also be pitched A-frame tent style with trekking poles.

PROS: These tarps are super light and pack small, can handle Pohnpei’s regular torrents, and provide plenty of durability. Unlike tents, they allow plenty of airflow, making sleeping more comfortable.

CONS: They’re super expensive — $285-300. They take some experience to hang properly and can be frustrating if you don’t know what you’re doing. If you’re pitching tent-style, you’ll need trekking poles or something else to use as vertical supports.

OUR RECOMMENDATION: The benefits of tarps far out-weigh those of tents when trekking on Pohnpei. Both the MLD Grace and Hammock Hexagon models are great choices that will perform well in island conditions.

How-To Videos

How to Hang a Ridgeline

How to Tie a Cow Hitch Knot

How to Use a Sleeping Hammock

Adventures >> Gear Recommendations >> Shelters

Temwetemwensekir Peak

Southeast of Palikir, Pohnpei’s primary mountain system makes an almost 90° turn to the south at Temwetemwensekir (594 m), a prominent peak that dominates the topography and feeds six major rivers. The all-day slog to the top begins up an unpaved road opposite the College of Micronesia national campus. Though the route isn’t always clear and the challenge of the climb is increased by rough terrain and a few steep pitches, once one reaches the palm forests on the ridge, it’s smooth sailing. Hikers are afforded some beautiful views of Nanpohnmal, Palikir, and peaks to the south of the summit area. Japanese trenches and an observation post can also be found at the northeastern corner of the plateau.

  • Plan for 8 hours for this hike.

Map Guides >> Mainland Sokehs >> Temwetemwensekir

Scroll to top