
Pahn Sile Waterfall
![]()
![]()
![]()
![]()
![]()
![]()
![]()
![]()

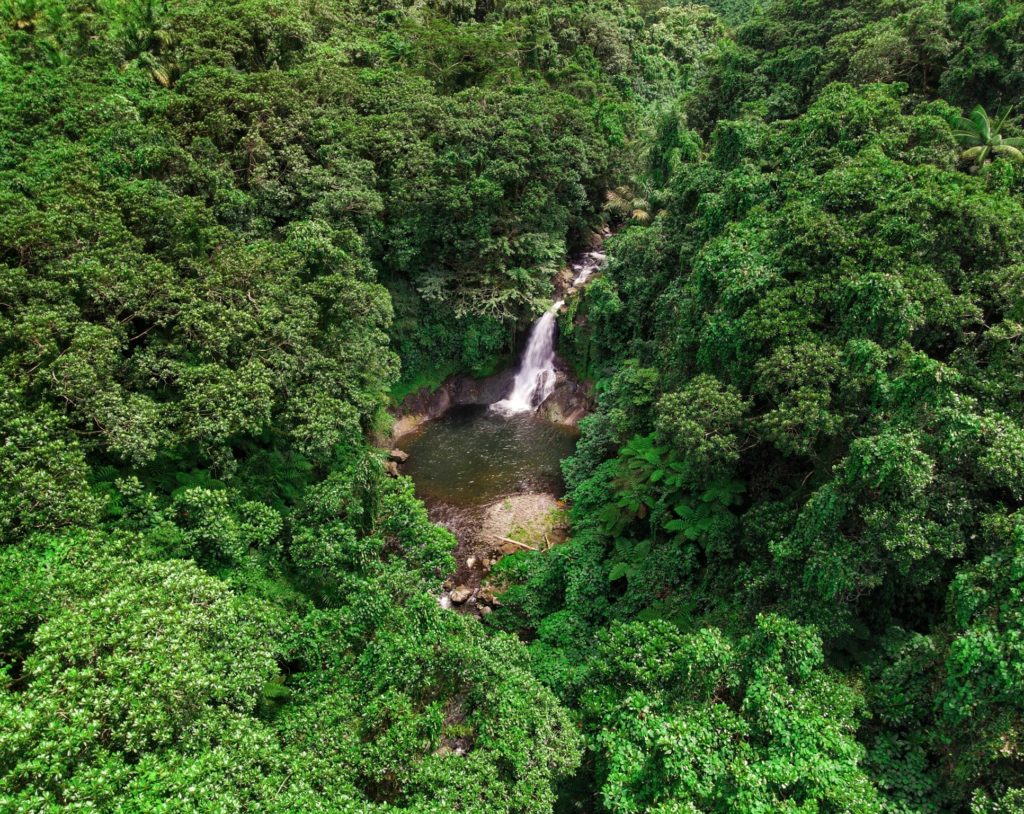
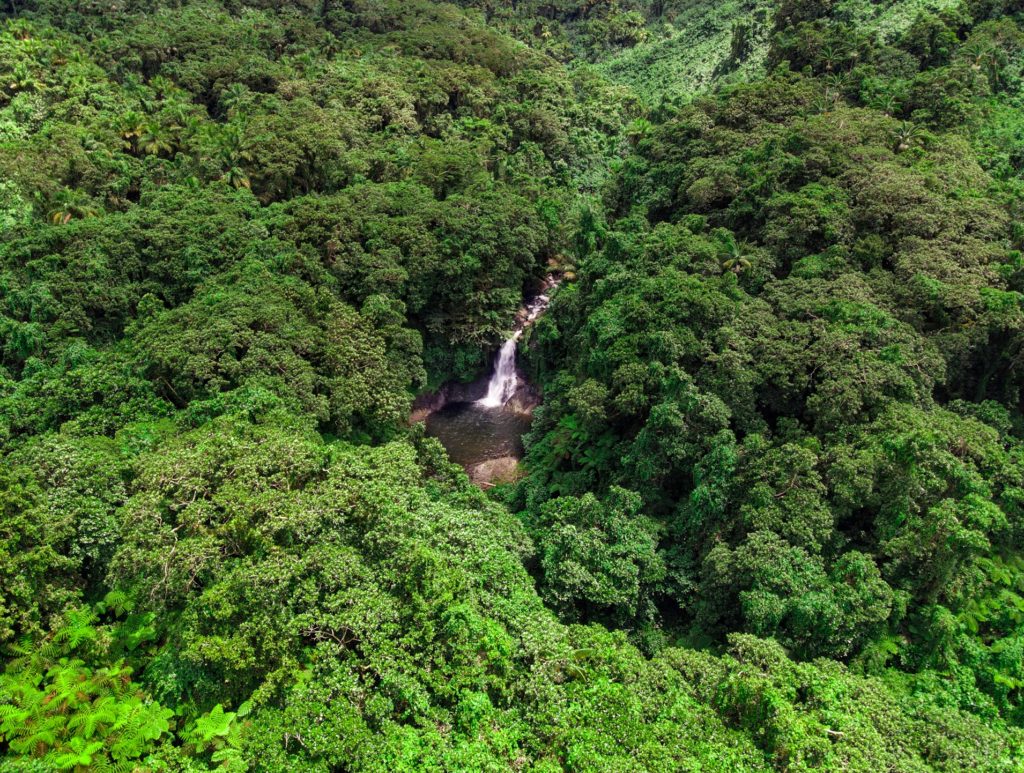
Located on the pristine Senipehn River, Pahn Sile is one of the few waterfalls well into the interior that almost anyone (even small children) can reach without the help of a guide — as long as you keep your eyes open for the branches in the path. A well-maintained trail begins at the end of the unpaved but well-graded coral and gravel road beyond Sapwalap Elementary School and opposite a concrete taxi stop. Houses are found along the path for much of the way, as well as historic rock-lined irrigation canals built by the Japanese. About 0.15 km (164 yd) before reaching the waterfall, a secondary path branches right and descends to a shallow point in the river, where you’ll cross and hug the right bank or walk in the stream as you continue to the falls just around the corner.
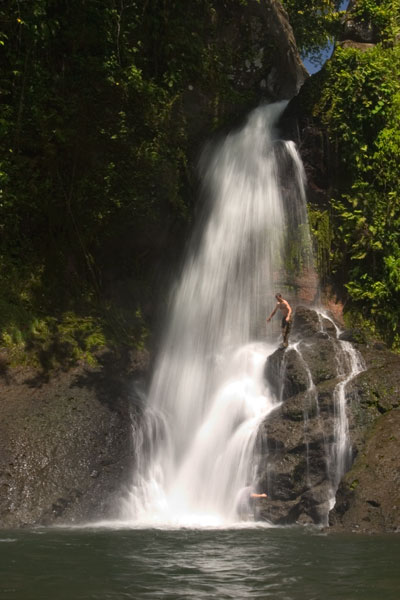
Pahn Sile‘s pool is wide and wonderfully cool, but not especially deep. The falls varies in volume depending on recent rain, gushing through a narrow portal and crashing onto rocks that form the rim of the pool. If you want a view from above the falls, bear left at the branch, proceed for 0.3 km (0.18 mi), and then cut off the trail and head straight toward the sound of the river. There is no path for this last part, but it’s easy enough to move through the forest. There are nice spots for a camp site above the falls in the forest along the path (pack out everything you packed in). In addition to the primary waterfall pool, there’s a small, deep pool just down river that is also an excellent place to swim, shaded by lush ferns and massive trees.
There are no access fees and no permission is needed to visit the falls.
If you would like a guide for the trip to the waterfall contact Raven at (+691)923-1862, he does not charge a fee but we do encourage you to tip him for his time.
- Plan for 3 hours round-trip for this excursion.

Paddling Lenger & Sapwtik
![]()
![]()
![]()
![]()
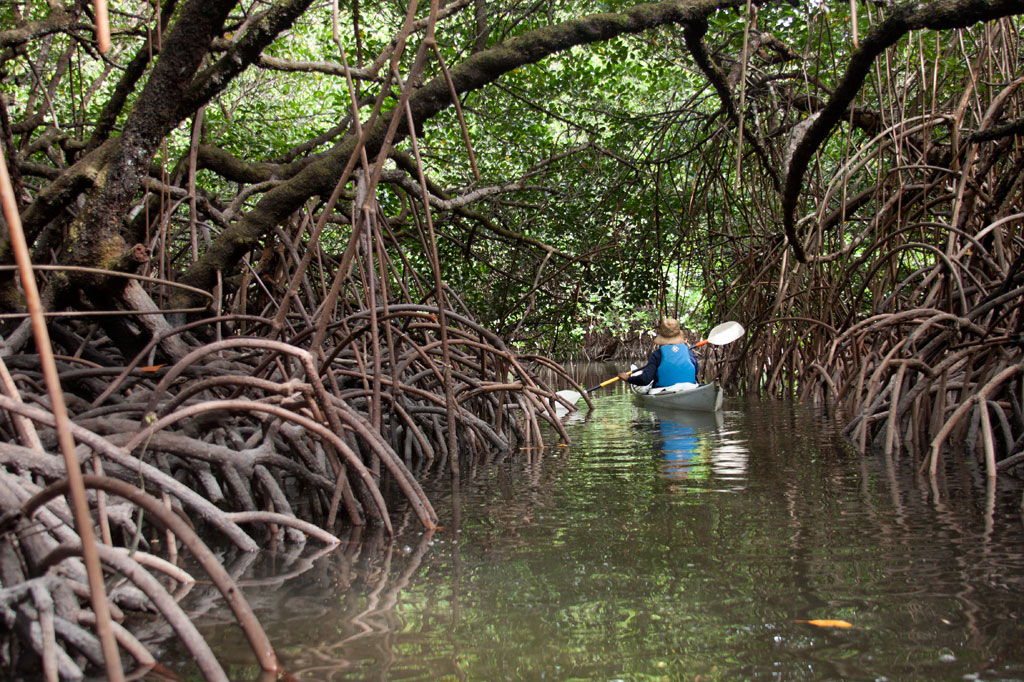
As the closest lagoon islands to Kolonia and with the highest concentration of WWII historical sites anywhere around Pohnpei, Lenger and nearby Sapwtik make fantastic destinations for paddling enthusiasts. In addition to the attractions on each of the two islands, there are mangrove forests and some interesting reef environments to explore.
Around Lenger
Pahnaiau Getaway (Barbosa’s Wharf) to the Seaplane Ramp
This portion of the route is characterized by Lenger’s shallow fringe reef, a sandy, silty expanse dominated by small-scale coral growth, brilliant blue starfish, cowries, sea cucumbers of various types, and scattered beds of seagrass, which Pohnpeian’s call oaloahd. Keep an eye out for the main attraction: stingrays. They generally rest on the bottom in the sand and will shoot off when you approach. Not far beyond the wharf is the Jaluit Cistern, one of the oldest historical sites in Pohnpei State. The cistern was probably constructed in the late 1880s by German traders operating on the coast. A stone wharf originally connected it with the coast, but a few scattered stones are all that are left. Bullet holes in the masonry were caused by Allied strafing during WWII.
If you decide to make a wider arc around the island, you’ll pass over areas where the reef shelf ends and the deep part of the lagoon begins. Small sea turtles are seen on rare occasions near the reef wall. The majority of the reef fish will also be found at this natural boundary. Note, however, that the reef stretches all the way to Sapwtik in the northwest and there is no way around Lenger’s northern end without crossing it. The depth over the shelf varies from a few centimeters to a meter, depending on the time of day and the precise location. Because fragile corals and other organisms are harmed by feet or dragging keels, the northern passage should be attempted at high tide only.
The Seaplane Ramp to the Mangrove Passage
The reef on the eastern side of the island tends to be deeper than in the northwest and has denser beds of seagrass. Larger fish are found in this area, and sometimes juvenile black-tip reef sharks can be seen swishing their way around.
The Mangrove Passage to Barbosa’s Wharf
The tunnel-like mangrove passage winds about a third of a kilometer through a dense section of forest that mostly comprises members of the Rhizophora genus, identified by the arching prop roots that extend out of the water toward the tree trunks. It’s a nice, scenic paddle and a good place to spot shorebirds like the Pacific Reef Heron and Micronesian Kingfisher. Once out of the forest, you can follow the coastline past the ruins of the Japanese-era Kohatsu Wharf and back to Barbosa’s Wharf.
Around Sapwtik
A relatively well-preserved Japanese wharf extends southwest from Sapwtik’s coast all the way to the edge of the reef. This is a wonderful place for a picnic and swim or snorkel. There’s one large tree on the wharf, offering shade. To the west is a maze of mangrove clumps that are fun to paddle through (though they are not as extensive as Lenger’s) before reaching the western terminus of the island. North of the point is an exposed rocky place that’s a perfect pull-out spot for a snack. A little beyond that is the site of the coastal battery and nearby munitions magazine. Conditions north of Sapwtik’s coastline are very similar to Lenger’s northern sector — shallow and characterized by seagrass beds and silt. You shouldn’t try to kayak here except at mid to high tides. All along the coast, you’ll find evidence of Japanese occupation, low walls, foxholes, rifle pits, etc.
| Starting | Ending | Distance (km) | Distance (mi) | |
| St. Peter’s Church, Sokehs | —- | Pahnaiau Getaway, Lenger | 7.93 km | 4.93 mi |
| Misko Beach, Dekehtik Island | —- | Pahnaiau Getaway, Lenger | 4.52 km | 2.8 mi |
| Ice Dock, Kolonia Town | —- | Pahnaiau Getaway, Lenger | 3.53 km | 2.2 mi |
| Nett Point, Nett | —- | Pahnaiau Getaway, Lenger | 1.97 km | 1.22 mi |
| St. Peter’s Church, Sokehs | —- | Japanese Wharf, Sapwtik | 7.75 km | 4.81 mi |
| Misko Beach, Dekehtik Island | —- | Japanese Wharf, Sapwtik | 4.34 km | 2.7 mi |
| Ice Dock, Kolonia Town | —- | Japanese Wharf, Sapwtik | 4.23 km | 2.63 mi |
| Nett Point, Nett | —- | Japanese Wharf, Sapwtik | 2.95 km | 1.83 mi |
| Pahnaiau Getaway, Lenger | —- | Japanese Seaplane Ramp, Lenger* | 1.52 km | 0.95 mi |
| Japanese Seaplane Ramp, Lenger | —- | Mangrove Passage Northern Entrance, Lenger | 0.58 km | 0.36 mi |
| Mangrove Passage Northern Entrance, Lenger | —- | Kohatsu Wharf, Lenger | 0.42 km | 0.26 mi |
| Kohatsu Wharf, Lenger | —- | Pahnaiau Getaway, Lenger | 0.51 km | 0.32 mi |
| Pahnaiau Getaway, Lenger | —- | Japanese Wharf, Sapwtik | 1.29 km | 0.8 mi |
| Japanese Wharf, Sapwtik | —- | Gun Battery, Sapwtik | 0.74 km | 0.46 mi |
*Shallow reef shelf. This segment is only passable at middle to high tides.
Takaieu & Dehpehk Islands
Takaieu and Dehpehk are two large volcanic islands connected by a bridge and linked to the coast of U by a causeway. Most of the local residents live around the eastern and northern coasts of Takaieu and the western coast of Dehpehk and commute to and from Pohnpei by boat. The islands are fun to explore if you want to get a glimpse of old-style Pohnpeian life sans roads and electricity. A seaward turn just before the Madolenihmw border brings one to the unpaved causeway. A well-maintained footpath runs east around Takaieu, crosses the Dehpehk-Takaieu Bridge, continues on the west coast of Dehpehk, and then wraps around the eastern coast, where it connects with another trail going over the interior hill. The marine areas along the eastern coast belong to the Dehpehk Marine Protected Area (MPA). No permission is needed to visit either island, but do be respectful and stay on the main paths around the inhabited areas.
")
Takaieu Island
Takaieu figures into a well-known local myth about two magical brothers. The island is said to have been created when these brothers dragged a large rock all the way from Yap — hence the name, which means “one rock.” The causeway road ends not far along the south coast and is replaced by a tidy rock footpath (vehicles can be parked on the side of the road near the trailhead). From there, the path bends around the mangrove-fringed eastern coastline, passing neatly maintained farmsteads here and there. Mwelling marks the spot of one of the megalithic structures built by Olsihpa and Olsohpa before they founded Nan Madol. The site is impressive, but is easier to reach by boat than from land. About halfway across the north side of the island, the path turns and connects with Dehpehk via a small concrete footbridge.
The Origin of Takaieu Island
There was once a woman in Salapwuk named Lienlama who had two sons named Mwohnmur and Sarapwau. The boys were quite mischievous and had many adventures that figure into Pohnpeian myth. In one story, the brothers went to the islands of Yap and used a magic spell to make a stone fly from that place to Pohnpei. They flew the stone to Wenik (modern-day U) and set it down in the lagoon, naming it Takaieu (“one stone”). They had brought some southern yams with them and they cooked these up, but threw the parts that were underdone into the forests of Alohkapw and Edienleng. And so they southern yam was first propagated in those places.
Dehpehk Island
Dehpehk is long and skinny with a low ridge running along its length. Like Takaieu, it forms its own sub-division, or kousapw, The trail on the west coast is narrow, but heavily used as there are many residences on this side. Once you’ve reached the northern extreme of Dehpehk, however, there’s little reason to go further as the trail gets steadily harder to follow where many of the houses have been abandoned. If you do want to continue, you’ll end up at a homestead with a large piggery. Here the path turns west and climbs over the central hill, reconnecting with the western coastal trail. There’s a nice elevated view from a point just below Dolen Dehpehk (100 m).
- Plan for 7-8 hours for this hike.
- To obtain a guide who can show you around both islands contact Pohnpei Surf Club as one of their boat drivers / dive masters is from the area and can provide assistance with exploring the islands.
Sapwtik Island
Sapwtik, which means “small land,” is a tiny volcanic island located directly north of Kolonia and 0.5 km northwest of Lenger. Seen in profile, the island resembles a large submarine, leading some locals to nickname it “Submarine Island.” Sapwtik is jointly-owned by the Eschiet family, which has some small houses at the eastern end of island, and their in-laws, the Adams family. During the 1880s, Sapwtik was purchased by Jan Stanisław Kubary, a Polish naturalist and ethnographer, along with a large piece of land east of what is now Kolonia — a place called Mpwoampw. In 1896, after returning from an extended absence and finding his homestead in ruins and his claims on the properties questioned by the Spanish authorities, Kubary committed suicide. Mpwoampw and Sapwtik were then purchased by Dominique Escheit, a Belgian trader who had operated in the Marshall Islands before coming to Pohnpei. Between 1914 and 1945, the Japanese were in charge and a great deal of land was seized by the military for defensive purposes — including Sapwtik. Like its neighbor, Lenger, Sapwtik was fortified in the late 1930s in preparation for an Allied invasion that never came. The primary features are found on the low hilltop and at the western terminus.
Sapwtik Island Attractions

Japanese Wharf
Visitors to Sapwtik will want to make their first stop at the Japanese Wharf, a 296 meter-long (324 yd) basalt structure that juts out from the island’s southwest coast all the way to the edge of the reef. With the exception of the very end, which has sustained some damage from waves, the wharf is in excellent condition almost 80 years after it was built — a testament to the quality of Japanese construction during the colonial period (and the use of the highly stable tanizumi, or herringbone, style of stonework). The wharf connects with the coastal road, also built by the Japanese, which skirts the mangroves from one end of the island to the other. The road is built above a stone retaining wall that stabilizes it against the swampy mangrove environment. Retaining walls also run along the opposite edge to prevent erosion from the steep hillside above.
Snorkeling & Swimming
All the ocean areas around Sapwtik belong to the Sapwtik Marine Protected Area, a sanctuary protected by legislation. The snorkeling off the reef walls at the end of the wharf is quite nice with generally good visibility and lots of fish. Just start at the wharf and follow the reef wall in either direction (the further from the island, the better it gets). The best place to swim is also right off the end of the wharf. Shallow areas on either sides of the wharf are silty.
")
Command Center & Barracks
The central hill is most easily accessed from the maintained Japanese coastal road. About 60 meters east of the wharf, hikers can cut off the road and up the slope (another 60 m) to reach the summit. The Adam’s family keeps the hill extremely tidy, cutting the grass, planting flowers, and keeping the historical features free of vines and brush. The place has a manicured, park-like feel and a stunning view of everything to the south. One of the best preserved yabane-tanizumi style rock walls on Pohnpei runs the length of the hilltop on the south side with two breaks, where earthen ramps lead up to the top. Two foundations were likely a command center and a barracks for personnel stationed on the island. The northern foundation is the largest and has seven sets of steps leading up to where the floor once was. The structure itself would have been wooden, while only the support posts and the lower parts of the walls were concrete. Two large concrete cisterns are connected to the two foundations (check out the bullet holes from Allied strafing). At the north end of the complex, the hill road begins, cutting right through the hill and running all the way to the gun batteries at the northwestern end of the island. Some of the road is currently impassable due to piles of felled trees and branches, but it’s impressive none the less.
To visit the gun batteries, it’s best to return to the coastal road and hike northwest all the way to the end. The road is well-kept and easy to follow.
Magazine Complex / Shell Storage
From the cut-off point for the hilltop, it’s about 150 m (164 yd) along the road to the first point of interest, a high-walled magazine complex for heavy ordnance similar to the one at the coastal gun battery on Lenger. The surrounding basalt rock wall (also tanizumi style) runs north and then curves sharply back to the south to enclose the foundation of the magazine structure, which is about 6 meters long. On the inside of the enclosure, the walls are steeply sloped. There is no roof, but the entire feature may have been covered with canvas and camouflaged during war-time. The entrance is narrow — less than 2 meters wide — and curved.
Coastal Gun Battery
About 12 meters northwest of the magazine is the first of four 75 mm field gun stations. These are similar to the structures on Lenger, though the Sapwtik sites are more primitive with less concrete and more earthen features. No guns remain, and two of the sites may have been decoys that never had guns installed. Guns would have protected the primary entrance to Kolonia at Pweitik Passage (Kepidauen Pweitik) to the northwest. A footpath continues north past the gun emplacements and then turns southeast to follow the contour of the hill. Along this are a few stone rifle pits or machine gun emplacements. Old Japanese beer bottles litter the forest.
[info]NOTE: The ruins of a searchlight and a tunnel, cutting completely through part of the central hill, also exist on Sapwtik, but we did not have the opportunity to locate them during our brief period of fieldwork on the island. If you’re interested in seeing these features, contact Richie Adams at (+691.320.5735). The Pacific Wrecks website has photos of both.[/info]
- To obtain permission to visit, call Richie Adams (Adam’s Brothers Corporation) at +691.320.5735 or call Ace Hardware’s office at +691.320.2723.
ACKNOWLEDGMENTS
The Sapwtik Island information would not exist without the cooperation of the Adams family.
Tour Operators & Local Guides
Tour Operators
Club Pareo
This Japanese operation specializes in SCUBA diving and has some very experienced staff, but caters primarily to Japanese tourists. Staff may not be very comfortable communicating in English with non-Japanese customers. Contact the club for details.
- +691.320.1498
- Club Pareo, P.O. Box K3165, Pohnpei, FM 96941
- pareo@club-circle.net
- www.facebook.com/CLUBPAREO
- www.pareopohnpei.club-circle.net
(Japanese-language web site)
Nihco Surf Camp / NIHCO Marine Park
Nihco Surf at NIHCO Marine Park focuses mostly on surfing expeditions, but also rents kayaks to guests, and runs trips to Ahnd Atoll. Contact Wilbur Walter for details.
- +691.320.2135 / 4659 / 6225
- Nihco Surf Camp, P.O. Box 327, Pohnpei, FM 96941
- NIHCOsurf@gmail.com
- p-pass.wix.com/nihcosurf
Pohnpei Surf and Dive Club (PSC)
Pohnpei Surf and Dive Club’s specialty is obvious, but in addition to surfing and diving, the club has jetskis, stand-up paddleboards and a great fleet of reliable boats. They offer tours to Nan Madol ruins by car or boat, waterfalls, island hikes, snorkeling or dive trips at the best locations for that day based on weather, tides and season( like Manta Road, Ahnd Atoll and Pakin Atoll). Rental dive, snorkel or surf gear are also available for rent at the location. The Pohnpei Surf and Dive Club is the longest running tour operation in Pohnpei conveniently operating from Mangrove Bay Hotel. They do free hotel pickups if you are joining a tour.
You can also check out Pohnpei Surf and Dive Club’s reviews on Tripadvisor HERE.
- .+691.320.7845
- P.O. Box 1893, Pohnpei, FM 96941
- pnisurfclub@gmail.com
- www.pohnpeisurfclub.com
- Pohnpei Surf Club on Facebook / Pohnpei Surf Club on Instagram
Seabreeze Hotel / Paradise Tour Service
Seabreeze Hotel has its own small tour service which can arrange a few different trips. Contact the hotel for details.
- +691.320.2065 / 2066
- P.O. Box 692, Pohnpei, FM 96941
- reservations@pohnpeiseabreeze.com / info@pohnpeiseabreeze.com / seabreeze@mail.fm
Yvonne’s Hotel
Yvonne’s is just starting to get into the touring business and can arrange a limited number of trips to well-known sites, such as Nan Madol and some of the popular waterfalls around the island. Contact the hotel for details.
- +691.320.5130 / 1248 / 7536
- P.O. Box 688, Pohnpei, FM 96941
- reservations@yvonneshotel.com
- www.yvonneshotel.com
For information on reliable tour guides it is best to contact a tour operation (such as Pohnpei Surf Club) in order to get the best person for the specific activity you would like to do, whether it is a trek up into the mountains, a trip to the Nan Madol ruins, or something completely different.
Footwear
Gear Advice: Footwear for Pohnpei
Zories / Flip-Flops

PROS: They’re ultra-easy to take on and off. Your feet are completely exposed to the air and dry quickly.
CONS: When wet or muddy, your feet slide around from side to side and from front to back. Straps are often too weak to handle rough treatment and frequently break. Zories get sucked right off your feet in swift-moving water, mucky sand, or oozy mud. They have absolutely no traction capabilities. Your feet are completely unprotected.
THE VERDICT: Flip-flops are great when cruising around town or hanging on the boat or beach, and that’s about it.
Tennis Shoes

PROS: They’re light. They breathe better and tend to have more flexible soles than heavier footwear, allowing your feet marginally better traction. The toes, tops, and sides of your feet are better protected from scrapes and bangs than with sandals or FiveFingers.
CONS: Tennis shoes have no ankle support. They inevitably get soaked in Pohnpei’s wet environment, and once wet, your feet stay wet. Furthermore, the shoes aren’t going to dry out between hikes in the humidity — even on sunny days. Though soles are thinner and more flexible than hiking boots or Teva-style sport sandals, the type of sole material and tread varies from shoe to shoe. By and large, tennis shoes don’t have tread that performs well on wet rocks or muddy slopes — the most common type of terrain Pohnpei hikers encounter. Shoes are easily pulled right off your feet in deep mud.
THE VERDICT: Tennis shoes are fine for short, easy hikes on roads or well-established gravely trails.
Cloth Hiking Boots

PROS: They’re only slightly heavier than tennis shoes. Soles and tread tend to be better designed for hiking in rough terrain than tennis shoes or sandals. They provide good ankle support. Your feet and ankles are protected from scrapes and bangs.
CONS: Breath-ability is poor. Your feet get wet and stay wet. The thickness of the soles makes it harder for them to adhere to wet, curved surfaces, such as river rocks. The deeper tread is mostly ineffective in muddy conditions as the grooves simply fill with mud. Just like tennis shoes, in deep mud, they can be pulled right off your feet.
THE VERDICT: Cloth hiking boots aren’t particularly useful on an ultra-wet tropical island. It’s best to leave them at home.
Hard-Shell Hiking Boots

PROS: They provide maximum ankle support and foot and ankle protection.
CONS: They’re unnecessarily heavy and wear you out faster than lighter shoes. The soles are thick and inflexible — highly undesirable when crossing slick rocks in rivers or scrambling up muddy mountainsides. They aren’t breathable at all; even if they’re fully waterproofed, your feet will end up soaked by sweat anyway. They’re absolutely impossible to deal with in deep, oozy mud.
THE VERDICT: Hard-shell boots are a very poor choice for this environment.
Teva-Style Sport Sandals

PROS: The open-air style allows your feet the greatest opportunity to dry out. There are less places for sand and grit to get stuck.
CONS: Your toes, heels, and the sides of your feet are completely unprotected and can be battered by rocks and roots. When wet, feet tend to slide around on the sole. Blisters around the straps are problematic on anything but short hikes. The Velcro fasteners get caught on vines and other things and pulled open. The thick, inflexible soles are nearly as bad as hard-shell boots when it comes to traction. For footwear designed with rivers in mind, they’re remarkably poor at adhering to wet rocks slimed with algae. They tend to become mired in deep mud like what you find in mangrove swamps.
THE VERDICT: Sport sandals work well when paddling, walking around town, or doing short, relatively-flat hikes on roads or well-established trails.
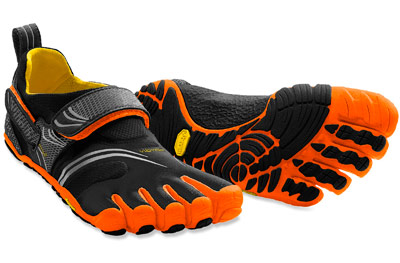
FiveFingers

PROS: The revolutionary design concept centers around research that has shown that balance and traction are significantly improved by having the use of your toes and letting your feet flex and mold themselves to whatever surface they move across. Thin, soft soles allow maximum flexibility and adhere well to wet rocks and other surfaces. “Free” toes can dig into mud for better traction, and because they fit like a second skin, they won’t come off your feet. They’re ultra-light. Thin material or mesh allow your feet plenty of access to air.
CONS: There’s no ankle support and minimal protection from the environment; toes, feet, and ankles can take a brutal beating from rocks and roots. You can’t just jump right into things; you have to break in FiveFingers, take some time to allow your feet to get used to full contact with the terrain, and learn to walk with greater care and precision. They are designed to fit like a glove, and consequently, are very difficult to put on. In sandy conditions, grit gets inside the heels and rubs the skin raw.
[info]OUR RECOMMENDATION: Despite a few disadvantages, FiveFingers out-performed every other type of footwear we tried in a wide range of settings. In our opinion, they are the best choice or hiking and trekking on Pohnpei. FiveFingers are produced by Vibram, which offers an extensive range of models that range from $50 to $150.[/info]

Dry-Bags & Packs
Dry-Bags
For ages backpackers and other outdoor adventurers have struggled to keep the contents of their backpacks dry when out in the elements. In some environments, where rain is a rarity, simply having a waterproof nylon bag-cover was enough. But in places where wet was the norm, bag-covers just didn’t cut it. For one thing, no bag-cover could ever seamlessly envelope the entire backpack; the area where the straps are was always uncovered, allowing rain to drip down the hiker’s back and eventually soak into the bag. Furthermore, the nylon covers were thin and relatively fragile. When pushing through trees or brush, they’d snag and tear. Some people resorted to lining the inside of their backpacks with garbage bags, which kept their stuff dry, but allowed the exterior of the bag to be soaked.
Eventually someone — probably a paddler — decided that what they needed was an air-tight / water-tight bag so secure it would even float if dropped into water. Enter the roll-top dry-bag.
Basic PVC Roll-Top Dry-Bags

Roll-top dry-bags work in the following way. There’s one opening at the top. Users fold the excess material at the opening over itself repeatedly and then use a set of plastic buckles to tightly secure it, trapping a small amount of air within the bag. Once clipped, the bag is fully-waterproofed and — presuming it has enough air trapped inside and isn’t too heavy — will float. The most common bags are made of PVC and consist of seamless cylinder with a bottom welded on, and in some models, also taped or glued.
PROS: Unless there’s some sort of manufacturing defect, these bags really do keep their contents dry, even when completely submerged, and that’s really the whole point. The heavy, durable PVC is rip and tear-proof and stands up to rough treatment just fine (I have one that I’ve been using for 19 years). The bags are excellent for use in boats, kayaks, canoes, etc. See-through styles are available, which allow you to figure out where something you need is before you dig around in the bag.
CONS: It is possible to puncture PVC bags with sharp objects. They’re heavy when compared to nylon and other typical bag materials. Because the PVC is quite thick, they don’t compress well when empty and take up a lot of space. The roll-top style makes them pretty inconvenient if you’re going to be removing and re-stowing things in your bag regularly (such as a camera). Kayakers will be forced to stop paddling completely and use both hands to open and close the bag properly — which may be impossible if there’s rough water or strong current. The bag interiors have no built-in padding, so something like a camera or lens has to be wrapped or otherwise cushioned in some way. Bags have no interior divisions or pockets, so finding one object is difficult without dumping everything out.
THE VERDICT: PVC dry-bags suffer from the same inconveniences as all roll-top bags, but they still perform very well when it comes to doing what they are designed to do — keeping your stuff dry. Good brands include Overboard, Seattle Sports, Cascade Designs SealLine, and Sea to Summit.
Basic Nylon Roll-Top Dry-Bags

Non-permeable nylon bags with the same design as the PVC bags are also available.
PROS: They’re super light and compress to almost nothing when empty.
CONS: The thin nylon is not very durable; it can snag and rip or tear and is far more prone to punctures than PVC. Seams are generally taped and glued, which theoretically should make them leak-proof, but sometimes they fail anyway. The nylon provides even less protection than the PVC for the contents of your bag. They have all the same inconveniences as any other roll-top bag: they take care to close up properly and have no inside divisions or pockets.
THE VERDICT: Nylon dry-bags really work best packed inside a conventional backpack or mesh dive bag. Using multiple nylon bags inside a backpack is one way to keep your stuff organized and dry at the same time. They’re too fragile to perform well on their own, however. Good brands include Overboard, Seattle Sports, Cascade Designs SealLine, and Sea to Summit.
[info]OUR RECOMMENDATION: Despite their many inconveniences, roll-top PVC dry-bags continue to be the most reliable and durable option for adventures on the water.[/info]
Roll-Top Dry-Packs
The dry-backpack developed from the simpler dry-bag concept — a heavy PVC sack with a single roll-top opening. The pack style incorporates back padding, padded shoulder straps, chest and waist straps, and (depending on the model) an outer pocket or mesh. There aren’t many brands that make dry-packs and two stand out — Overboard and Seattle Sports.
Seattle Sports Aquaknot Dry-Pack

PROS: The Aquaknot performed well on both trekking and paddling excursions on Pohnpei. It never leaked. Though not as heavily padded as the Overboard bags, the pack is comfortable enough on the body. The model comes in two capacities — 22 and 29 liters. It has one mesh side-pocket on the outside for a small bottle or other object. There are two clipping options. The chest strap and waist belt help distribute weight across the body.
CONS: The bungee area is useless; it would have been better with a rear pocket instead. There are no interior pockets or other divisions. Access is only through the roll-top.
THE VERDICT: This is a good, solid, dependable bag. Though slightly smaller than the Overboard models, it measures up.
Overboard Dry Backpack

PROS: When tested on Pohnpei, the bag stood up to abuse and never leaked. The padded shoulder straps, back, and lumbar support make this bag pretty comfortable to wear, even when it’s heavy. The chest and waist straps help keep the weight positioned properly on your body. With three different capacities going up to 30 liters, there should be plenty of room for gear. The single interior pocket is great for small stuff you need to find quickly like a flashlight, keys, or box of matches. There are two options for clipping the top closed and a nice top handle for picking up the bag. There’s an elasticized mesh pocket on the side, which can handle small bottles or other objects.
CONS: There are no interior divisions and no interior padding to protect gear. Contents can only be accessed through the roll-top. The bag is heavier than a conventional backpack. The bungees on the back are mostly useless; they stretch out over time and get snagged on stuff. The Velcro strap on the top doesn’t really do anything except get snagged on low branches and brush.
THE VERDICT: Though it lacks a few useful features, this pack performs well and has a good design.
Overboard ProSport Dry Backpack

PROS: Like the other packs we’ve reviewed, this model has good padding on the shoulder straps and back, a comparable chest strap and waist belt, and a top carry handle. It also has a zippered interior pocket. The capacity is 30 liters — plenty big enough for all the gear you need on a short trek. It never leaked when we tested it in a wide range of conditions on Pohnpei. One thing it has that the other bags don’t have is a useful zippered mesh pocket on the back. And for some reason, it’s slightly cheaper than the other Overboard bag above.
CONS: Other than the one pocket, there are no interior divisions. The bag has no padding. It’s heavier than a conventional backpack. The contents can be accessed only through the roll-top. The bungees aren’t really useful for anything.
THE VERDICT: This is a very good dry backpack with a few small advantages over the Overboard Dry Backpack and Seattle Sports Aquaknot.
[info]OUR RECOMMENDATION: The two Overboard bags are nearly the same, but the ProSport narrowly wins out due to a couple of small features and slightly cheaper price. The Seattle Sports Aquaknot is also excellent if you’re looking for a smaller bag.[/info]
Backpacking Stoves
Gear Advice: Backpacking Stoves for Pohnpei
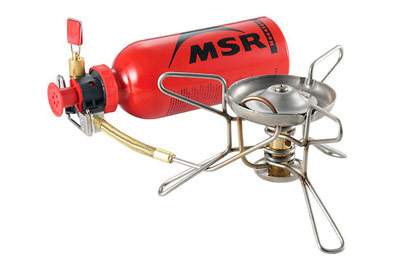
Liquid Fuel Stoves
 Liquid fuel stoves, such as those made by MSR and Optimus / Svea, are an option on Pohnpei, as white gas is available at the local hardware stores.
PROS: They heat quickly and have adjustable flames. They perform well in windy conditions. You can buy the fuel on-island.
CONS: You can’t bring these stoves on the airplane — you’d have to ship them to yourself surface mail, which would take up to 2 months. Liquid fuel stoves are also notorious for clogging. You have to waste fuel to prime some of them. The fuel is pretty toxic, and if it leaks in your pack, it will ruin a lot of stuff. Fuel has to be stored in metal bottles — which are heavy. The stoves themselves are also heavy.
Canister Stoves
 These stoves are fueled by an external butane or propane fuel canister that is thrown away when depleted.
PROS: They are more fuel-efficient than a liquid fuel stove.
CONS: The canisters are expensive and heavy. You can’t find replacement canisters in Pohnpei’s stores. Canisters can’t be brought on an airplane at all (including airmail), because they contain pressurized, flammable material. They’re also very bad for the environment; empty canisters can’t be refilled — they end up as trash.
Alcohol Stoves
 The last choice is the alcohol stove. This is the simplest type of stove, the lightest, and the least prone to malfunction, because it has no complicated parts (no parts at all). It is nothing more than a reservoir that holds fuel, which is set aflame and burns out on its own.
PROS: The benefits of this stove type for an adventure trekker are many. Alcohol stoves are small and weigh less than 28 g (5 oz). They are fueled by denatured alcohol, which is cheap and can be purchased at Pohnpei’s hardware stores. Fuel can be stored in a regular plastic bottle. You can make the stove itself for less than $10.00 with simple materials found on Pohnpei, so you don’t need to worry about bringing one. If you do bring one, it can be taken on the airplane, as long as it’s clean.
CONS: Alcohol stoves have a slower than average boil time (6-8 minutes) and a lack of flame adjustment. It’s easy to crush these tiny stoves, but they can usually be bent back into shape with relative ease.
[info]OUR RECOMMENDATION: A self-made cat food can alcohol stove combined with a home-made windscreen is by far the the most practical and affordable choice for Pohnpei trekkers. Watch Andrew Skurka’s video below to learn how to make this awesome stove.[/info]
Backpacking Cookware
Gear Advice: Backpacking Cookware for Pohnpei
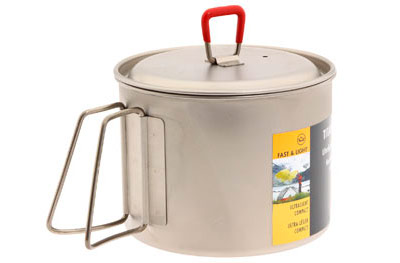
MSR Titan Kettle
 This is a popular model among ultra-light trekkers. It holds 0.85 L (0.9 qt) and has a lid and folding handles.
PROS: It’s light — just 4.2 oz (119 g) — very durable, and not too pricey (about $60.00).
CONS: After heating, the handles are too hot to pick up bare-handed. This pot has a reputation for being hard to clean (some foods tend to stick). It’s too small if you’re cooking for two.
Evernew Titanium Pasta Pot
 This is a 1 L (1 qt) pot with folding insulated handles and lid.
PROS: It’s even lighter than the MSR Titan Kettle at 4.1 oz (116 g). The insulation on the handles makes it possible to grip them without protection. It has a nice strainer feature on the lid for pouring off excess water. You can get it for cheaper than the Titan, too, at about $45.00.
CONS: It’s not quite as durable as the MSR Titan. Like the Titan, it’s a small pot that isn’t practical when cooking for others.
MSR Base 2 Pot Set
 If you’re cooking for two or more, the MSR Base 2 Set is an option. It includes 1.5 L (1.6 qt) and 2.5 L (2.6 qt) pots that nest inside each other, a lid, and a detachable pot-holder.
PROS: For what’s included, the weight isn’t too bad — about 1 lb (481 g) for everything. The coating on the pots prevents sticking of food, making cleaning easier. The detachable handle doesn’t get hot the way an attached handle does.
CONS: Aluminum isn’t as light as titanium and it’s also less durable — the pots tend to get bent out of shape. They also scratch easily; the coating doesn’t stand-up over the long-term. It’s way too heavy if you’re cooking just for yourself.
[info]OUR RECOMMENDATION: If you’re eating on your own, the Evernew Titanium Pasta Pot narrowly beats out the MSR Titan. If you’re cooking for a small group, the MSR Base 2 Set is the best choice.[/info]
Water Bottles
Gear Advice: Water Bottles for Pohnpei

Hard-Sided Bottles
Hard-sided plastic bottles made by companies like Nalgene are a common choice among backpackers.
PROS: They don’t leak in your bag or crack when dropped (at least the stalwart classic model).
CONS: They’re heavy and bulky, and an empty bottle will take up just as much space in your pack as a full one. This is a problem when you’re doing longer hikes, where every bit of your backpack real estate is precious, or when covering very rough terrain, when you want your load as light as possible.

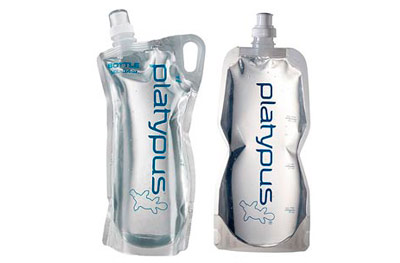
Collapsible Bottles
An alternative to hard bottles are soft-sided bottles, like those sold by Platypus. These are essentially the modern version of the water skin. They have small openings to prevent the water from spewing out when handled.
PROS: They’re light and can compress to next to nothing when empty.
CONS: They can rip or puncture, and they aren’t as easy to refill as hard-sided bottles because of the small mouths.

Hydration Bladders / Reservoirs
A third choice for water storage is a hydration bladder or reservoir. This is essentially a large, plastic water sack with a drinking tube and valve at one end. Bladders usually go with a canvass or nylon pouch or backpack-style carrier. Many good companies make them, including Camelbak, Platypus, MSR, Nalgene, and Osprey.
PROS: There are several really strong points to using bladders. They allow you to distribute the weight of the water you’re carrying evenly across your back, and they are lighter than hard-sided bottles. The bladders are designed to lay flat, and because they are soft-sided, you’ll never have to worry about the corner of a bottle sticking into your ribs or scapula as you hike. You can find backpacks with an outside pocket specifically designed to hold the reservoir. The reservoir doesn’t need to be removed from your pack in order to drink, because the drinking tube is always hanging over your shoulder. In fact, you don’t even need to stop hiking; you can just grab the valve with your mouth and bite down on it to drink as you chug along. Almost all bladders have a large screw-top opening, which makes filling them easier.
CONS: Reservoirs are designed to carry all your water, so they tend to be much bigger than soft-sided bottles, and as you drink the water, what’s left sloshes around a lot until you stop to refill. Marginally annoying. They are also heavier than soft-sided bottles, mainly due to the drinking tube. Like soft-sided bottles, bladders can be punctured or torn and are also prone to leaks at the seams. Filling them completely can be a challenge if you’re dealing with a stream or waterfall; you’ll need someone to hold the bladder up in the air and then either pour or pump water into it (you can’t fill it while the thing is lying on the ground). The bite valves get chewed up over time and don’t work as well anymore. They can also clog easily if there’s any sediment in your water. Perhaps the biggest drawback is keeping bladders clean. They don’t dry easily inside and are prone to bacterial and fungal growth; it is necessary to regularly flush them with vinegar, baking soda, or bleach. Sometimes the water can taste a bit funky compared to other types of water storage — probably due to the previous point. Finally, bladders are the most expensive option for water storage.
For an in-depth review of the top 10 hydration bladder models on the market, check out this article at SealGrinderPT.
[info]OUR RECOMMENDATION: Hard-sided bottles are fine for half-day hikes, but soft-sided, collapsible bottles are more practical for longer treks when weight and efficient use of pack-space are crucial. Bladders have some definite advantages for shorter hikes, but also score below soft-sided bottles in terms of practicality for multi-treks in challenging terrain.[/info]